
by David Tyler | Sep 11, 2017 | Broadcasting, Marketing, Marketing Small Business, Media Relations, Media Training, PR, Public Relations, Radio, TV News

Seriously, who couldn’t use a little bit of free publicity, right? It doesn’t matter if you’re a C-Suite executive, small business owner, or a solo-preneur, for one reason or another the media will come calling…and you need to be prepared to face them. A good interview will help you to put your message “out there”. The bonus is that it’s free publicity!
An Interview Is Forever
It doesn’t matter how good you are at speaking one-on-one or to a group of people in the boardroom. When the lights come on or the microphone is put in front of you, doing an interview is a whole different ballgame. What you say during your interview and how you say it will be forever in the public record as a video or audio recording that can be played back and used whenever the broadcaster sees fit so be prepared.
The 7 Keys to A Killer Interview
Here are 7 key things to remember as you prepare for and execute your media interview:
- People relate to real people so be natural, be your self.
- Relax. In some circumstances easier said than done I know but relaxing will help you be attentive and in the moment.
- A way to be sure you’re relaxed is to be prepared. Know the subject you’re being interviewed about by reviewing notes and documents.
- In order to get the most out of your chance in the spotlight, prepare 3 or 4 key messages you want to incorporate into the interview. Have those 3 or 4 points printed out on a single sheet of paper large enough for you to see easily.
- Speak your audience’s language by not using industry jargon that they won’t know.
- Keep your sentences short and to the point. It will help your audience follow you and depending on how the interview will be used, will make it easier for the editor to pull “sound bites” ensuring a longer shelf life to your interview.
- No matter how ill prepared a reporter may seem to be or doesn’t appear to understand the subject matter, never get angry or speak in a condescending tone. This is your time to shine so be gracious.
Bonus
An important extra point is that you can be in control of the interview. Don’t feel that you need to stick to what your interviewer is asking. If the reporter doesn’t bring up the key points you want to make do the old politician switch-a-roo. Acknowledge the question by saying “that’s an interesting question but…” and then adding the point you want to make.
Not All Interviews Are Alike
Of course, there are different reasons you may be asked to speak with the media and each should be prepared for differently. If you need help preparing for your interview I’d love to help, just send me a note or call me at one of my numbers above.
A Final Thought
When I worked in radio I knew that I was only as good as my last break and that my audience was continually tuning in and out, so I made every break count and you need to do the same. Remember, first impressions are lasting impressions so assume that every time you do an interview that it’s a completely new audience and a new set of people you’re meeting for the first time, make it count!

by David Tyler | Feb 11, 2016 | Audio Production, Post Production, Radio, TV commercials, TV News, Voice Overs

Whether you work in a radio production studio, post production sound studio, TV edit suite, a bedroom project studio or world class music recording facility, the placement of your reference monitors matter.
When making critical decisions about EQ and stereo placement…if your studio reference monitors are not placed correctly your audio mix will not translate outside of your studio environment.
I’ve put together these 6 tips to getting your reference monitors properly setup and placed so you can get the best out of your studio recordings.
1. Don’t Use Consumer Speakers
It must be said straight away that using so called “consumer” speakers as a way to mix your audio is a mistake. Most consumer speakers are made to enhance the sound coming out of the speakers, to make it sound more pleasing for the casual listener. In your recording environment you want the flattest, most neutral sound possible to help you make the right decisions for your mix.
Studio reference monitors come in many sizes and price ranges. Here is a Top 10 list of the best recording studio reference monitors from Attack Magazine. If you’ve been mixing with home speakers and want your mixes to sound their best, it’s time to invest in proper recording studio reference monitors.
I use Behringer TRUTH B2030A reference monitors in my studio…no, they didn’t make the list, but I like them.
2. Stay Away From the Walls
I remember many years ago when shopping for a pair of new speakers for my home, the salesman placed the speakers right up against the wall, going as far as to cram a cassette tape box between the speaker and the wall to “bring out the bottom end” as he put it. When you place a speaker against a wall it gives it an accentuated bass response…something that may sound cool in your living room, but simply won’t do in a recording studio environment.
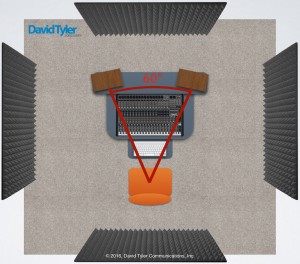
Freestanding placement of your reference monitors is ideal. See my example below.

Free-Standing Placement
Most studio reference monitors come with recommendations to compensate for your room if you need it. My Behringers let you adjust low frequency, high frequency and give an option for room adjustment (see photo below). Read the manual that came with your reference monitors.

3. Keep Them Symmetrical
When you place your studio reference monitors keep them positioned symmetrically. The distance from the speaker to the left and right wall should be identical. Likewise the 2 monitors should be the same distance from the back wall.

4. The Ideal Angle
Putting your reference monitors too close or too far apart from each other will give you a false sense of the stereo image you’re trying to create. Ideally, place your speakers about 3 feet apart and each speaker 3 feet from your sitting position. The ideal angle for your reference monitors is 60º…or 30º to the left and 30º to the right of your listening position.
5. Watch Out for Reflections
To get the most out of your reference monitors you’ll want to have as clean a monitoring environment as possible. This means minimizing the amount of reflective surfaces in your room. Keep in mind that reflections don’t just come from the walls but also from unavoidable surfaces like your mixer or table top, maybe even a TV screen. Minimize the amount of reflective surfaces directly between you and your monitors as much as possible by laying down a thin rubber mat on your table tops, perhaps lift up the rear of your mixer to change the angle of any reflection bouncing up at you from it. You’ll also need to think about your ceiling…reflections will be bouncing down towards you unless you place acoustic treatment up there also.
Don’t forget reflective surfaces behind and/or to the side of your listening position. They will add longer (delayed) reflections and influence your mixing choices.
Don’t try to create a completely “dead” room like the anechoic chamber at Orfield Laboratories in South Minneapolis, meaning no reflections anywhere, because that is a completely unrealistic listening environment.
6. Control Your Volume
It goes without saying that working in your studio at high volume levels is not good for your hearing over the long term.
In the short term, mixing at loud levels will give you bad results when your mix is listened to at average, lower levels.
It doesn’t matter how much you paid for your reference monitors, it’s a scientific fact that the louder you listen to music the more the lows and highs drop off. Trying to EQ the low end of your project while blasting your speakers will leave the bottom sounding flat when listened to at normal volume, the same goes for the high end. The phenomena is best explained through the Fletcher-Munson curves.
If you want to get the most out of your reference monitors use them at a reasonable volume in the range of 80-85 dBspl.
Conclusion
Setting up your studio reference monitors properly will enhance your recording studio environment and ultimately the audio output of your studio.
I hope these tips have helped you. Do you have any tips to add? Enter it in the comments field below.
by David Tyler | Dec 14, 2015 | Branding, Copywriting, Marketing, Radio, Radio Imaging, Writing
I remember the scene vividly. It was the Christmas episode of WKRP called “Bah, Humbug” (Episode 0052 to be exact) a WKRP version of ‘A Christmas Carol’. In the episode Mr. Carlson is haunted by the three ghosts of Christmas past, present and future. Dr. Johnny Fever, as the ghost of Christmas future, shows Mr. Carlson that the station has become totally automated, in fact Herb, who has taken to talking to himself is the only employee left. At the time I saw this I wasn’t working in radio but thought, ‘what a sad thing to happen’!
Well folks get your bags and get ready to disembark because we have arrived at Christmas future! While it takes more than one person to run our radio stations our on air product has become as homogenous as a computer chip generated playlist could make it. We only play the songs that have been tested and we only test the songs that are already being played by everyone else, not wanting to ‘take a chance’ on an unproven song. The focus of our marketing is on the morning show because that’s the only live, local part of our day…if that. To make it worse new radio talent isn’t being developed or can’t be developed because of the state of radio. Does this really mean that radio is dead? Not necessarily.
The Future
What radio has failed to learn are the tricks that marketers have been using for decades, despite having the concepts poured out right in front of us in the form of national commercials. So what can we learn from them? Simply put, ‘Branding’!
Understand How Your Audience Sees You
McDonalds made a mistake when it introduced the ‘adult meal’ because they forgot how their customers saw them…as a restaurant for kids. While it made sense for them to introduce a McMeal for adults, after all it is adults who are bringing their children to eat at the golden arches.
Speak To Your Audience
Back in the days when there were no other real entertainment options it was easy for radio to take itself too seriously, believing listeners to be mere minions cowering beneath powerful broadcast towers. Well, it’s not so much like that anymore. Speak to your listeners in a human voice, both in your promos and imaging as well as your live on-air presentations. As often as possible include the listeners point of view in your promos. Stop trying to “sell” your listener and talk to them as an equal.
Stay Focused
Whenever you sit down to write promos/liners keep your ‘brand’ in mind and never stray from the vision of who your listeners believe who you are.
One of the advantages we have over the Coca-Cola’s of the world is that we ARE a broadcast medium. So why don’t we use that to our advantage?
Branding your radio station should be the singular focus of your ‘anti-Christmas Future’ efforts to increase market share and to make yourself stand out as a viable entertainment option for your audience. Here’s one last thought to help motivate you: imagine your sales director running your radio station, alone from a single computer terminal…scary thought? Get to work on your brand quick!


